The Ultimate Guide to Basement Sumps

Sump Pump Monitor

The Ultimate Guide to Basement Sumps

A sump pump collects and removes excess water in a basement, typically from groundwater or rainfall. It is a crucial piece of equipment to prevent basement flooding. A basement sump is usually located at the lowest point in the basement and along a foundation wall. A sump pump system is a crucial piece of equipment for preventing basement flooding. The system usually includes a sump pit, a sump pump, and a discharge line equipped with a check valve to prevent backflow.

Topics in our Ultimate Basement Sump Guide

Case Study – Basement Sump Alert

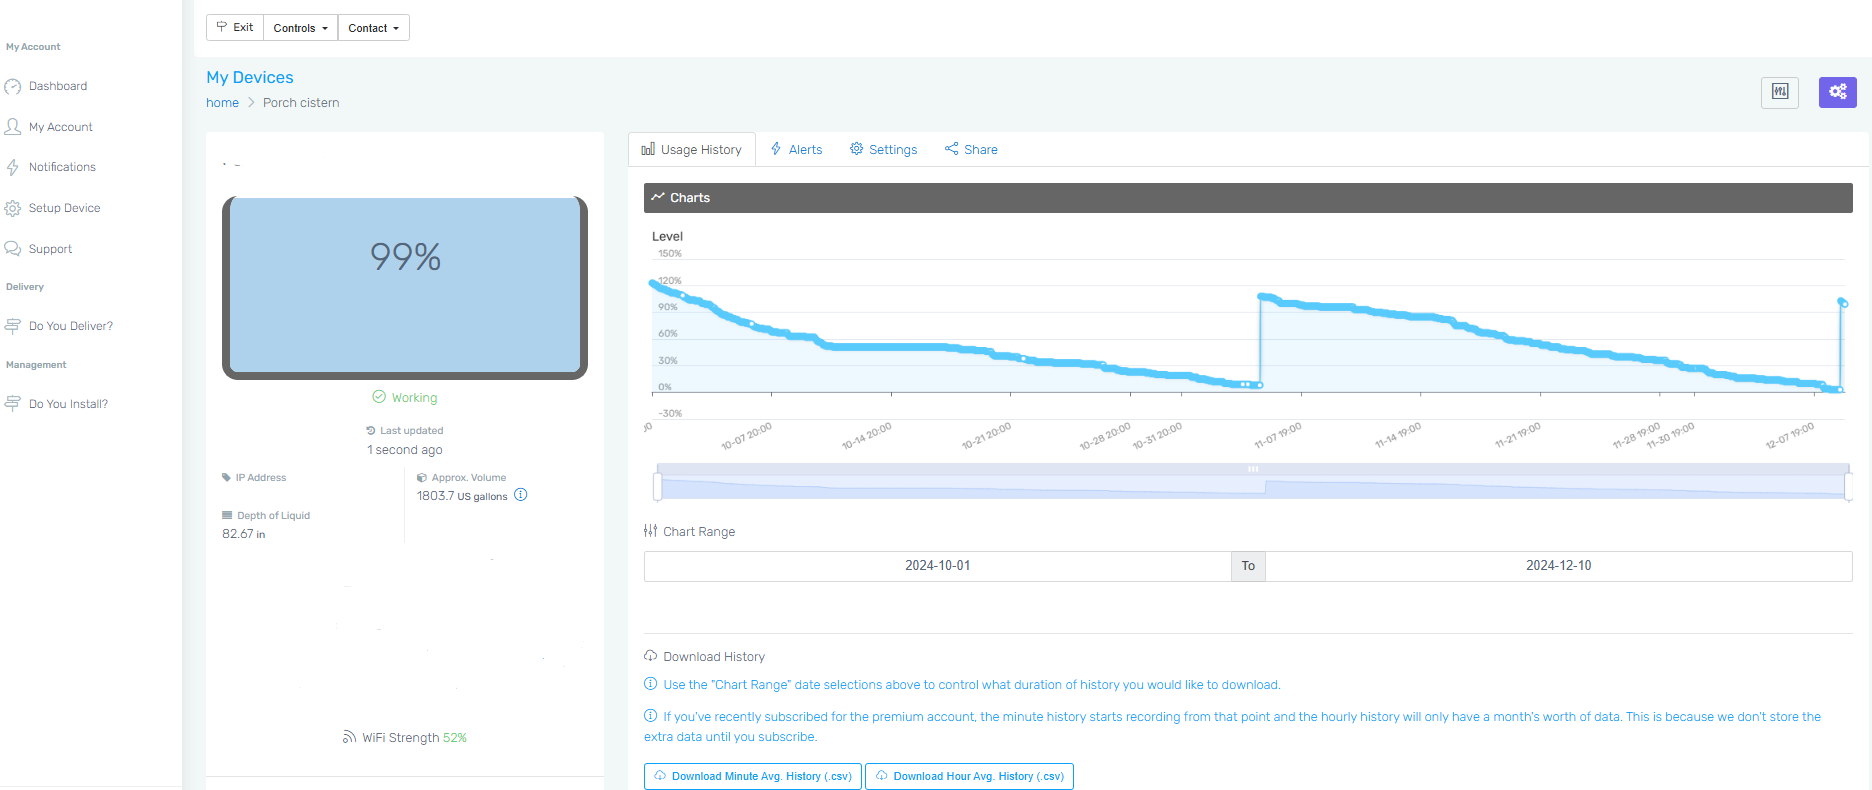
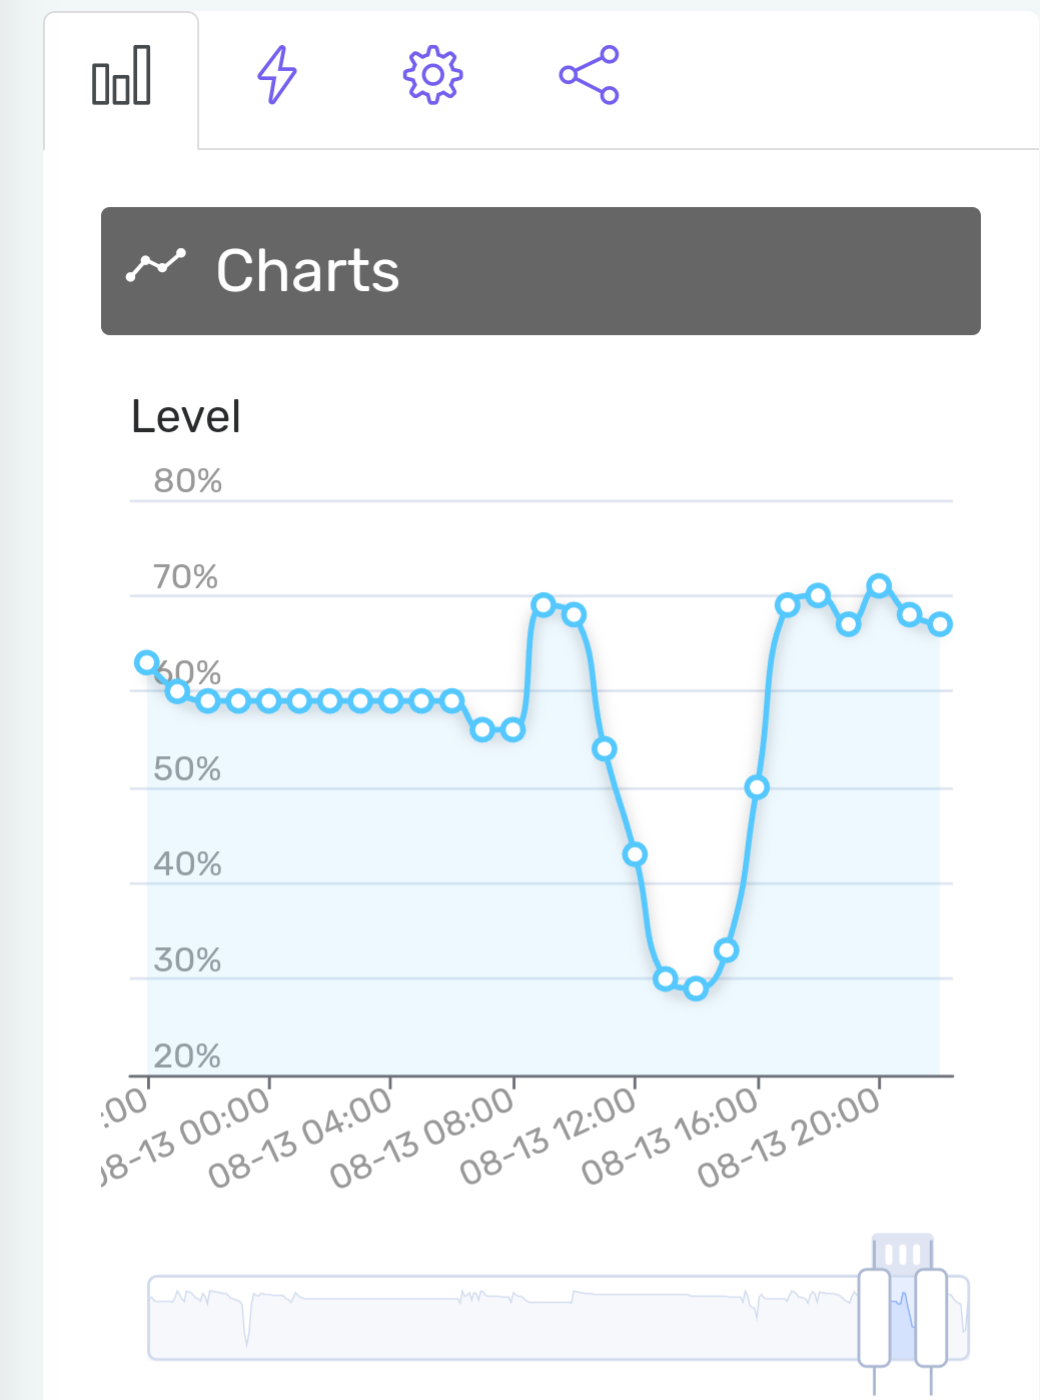
Although the PTLevel was originally invented because of the need for better water delivery management, our ParemTech Team has benefited the most from basement sump monitoring with the PTLevel! In June of 2025, one of the bosses (Mike) received an email while out fishing; “Device Alert – Your level, Basement Sump, has gone below your set point of 20%”.

Thinking back on the day, Mike remembered he had been working near the sump earlier. Sure enough when he got home, he immediately checked the sump and found the had unknowingly bumped the float so it got stuck. This caused the sump pump to continue running even though there was no water. Without the alert from the PTLevel, the pump could have been running for hours longer causing damage to the pump or even overheating the pump.

PTLevel Sump Hole

Introduction: What is a Basement Sump?

A basement sump is a pit or basin located at the lowest point of a basement or crawlspace. Itโ€™s designed to collect waterโ€”typically from drainage systems or natural groundwater that seeps in during wet weather or snowmelt. The water collects in the sump pit and is then pumped out and safely away from the home using a sump pump.

How a Sump System Works

A properly functioning sump system acts as your homeโ€™s first line of defense against basement water intrusion, helping protect both your property and your peace of mind.

Key Components of a Sump Pump System
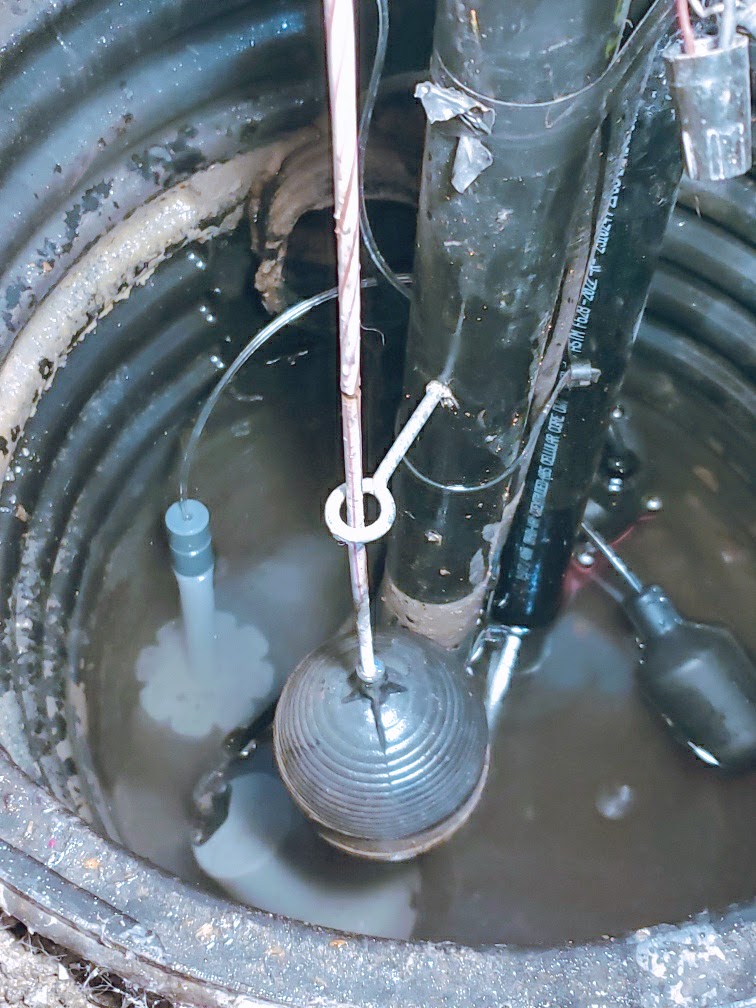
Basement Sump Pit

Sump Pit

Also known as a basin, the sump pit is a constructed hole dug in the lowest part of your basement floor. It collects water from your perimeter drains, natural seepage through the foundation, or surface water and spills.

Sump Pump

Sump Pump

The electric pump sits in the pit and removes the water once it reaches a certain level, pumping it away from your home. Often the level is triggered by a float.

Check Valve for basement sump

A one-way valve installed on a discharge pipe. It stops water from back flowing into the sump pit after it’s been pumped out. Although the check valve isn’t required, it’s highly recommended to have one so the pumping is more efficient.

Discharge pipe from basement sump

Discharge Pipe

A discharge pipe carries the water away from your foundation, ideally at least 20 feet away to prevent it from seeping back towards the basement.

How Water Enters a Sump Pit

Water can get into a sump pit in a few ways:
– Drain Tile Systems: A system of perforated pipes installed around the foundation of the house collects water and then channels it into the pit
– Natural Seepage: Groundwater or rainwater that penetrates the foundation walls or comes up through the floor will find its way into the sump pit due to gravity
– Basement Floor Sloping: Concrete floors are often sloped, very subtly, to guide the water to the sump pit

How the Sump Pump Activates

Almost all sump pumps are controlled by a float switch. A float switch is a device that rises and falls with the water level. Most floats look like a balloon or cylinder made of hard plastic and are attached to the pump via a metal rod. When the water rises and lifts the float, it turns the pump on. When the pump draws enough water out of the sump pit, the float lowers with the water level, and the lowered float will trigger the pump to turn off. The pump draws the water out of the pit via the discharge pipe and out of the home.

Types of Sump Pumps

Not all sump pumps are created equal. There are several types designed to suit different basements, budgets, and levels of water risk. The most common types of sump pumps are:

Submersible vs Pedestal Sump Pumps

Submersible Sump Pumps:

Submersible pumps sit inside the sump pit and are fully submerged in water when operating. They are generally quieter, more powerful, and better for homes with higher volumes of water. Submersible pumps have a sealed design which helps protect the motor from debris, but they can be more expensive and harder to access for maintenance.

Pedestal Sump Pumps

With pedestal sump pump systems the motor is mounted above the sump pit, with a hose or pipe extending down into the water. Pedestal sump pumps are typically less expensive and easier to service; however, theyโ€™re louder, more exposed to potential damage, and not ideal for pits with limited space or higher water flow.

Battery Backup Systems

A sump pump is only as reliable as its power source. If the electricity goes out during a storm, a battery backup system kicks in and keeps your pump working. These systems are essential for homes in flood-prone or storm-prone areas, offering peace of mind during outages.

Smart Sump Pump Monitoring

Smart monitoring tools can alert you to potential issues before they become disasters, like a failing pump or rising water levels. Devices like the PTLevel offer real-time monitoring and alerts when water levels get too high or your pump isnโ€™t performing properly. We’ll cover this in detail later in the guide, but just know: a smart system adds a whole new layer of protection. Some insurance companies even offer a discount if your basement is monitoring by a smart sump pump system.

Smart Sump Monitoring and Alerts

Youโ€™ve installed a sump pump, maybe even a backup system. But hereโ€™s the truth: you still might not know when something goes wrong until itโ€™s too late.

Sump pump failure can happen suddenly, and often when your home is most vulnerable: during power outages, storms, or spring melt. Thatโ€™s where smart sump monitoring makes all the difference. It’s not just a luxury anymore, it’s an essential layer of protection.

Why Smart Sump Pump Monitoring Matters

Most people only check their sump pump after a storm, or worse, after their basement is already wet. But water problems can happen quickly and silently, especially during:
– power outages
– mechanical pump failures
– frozen or clogged discharge lines
– stuck float switches
– a pump that cycles continuously leading to pump burnout

A traditional system gives you no heads-up. A smart system gives you time to act. Without feedback or alerts, you might not discover a problem until it becomes a major insurance claim.

Key Benefits of the PTLevel for Sump Pump Monitoring

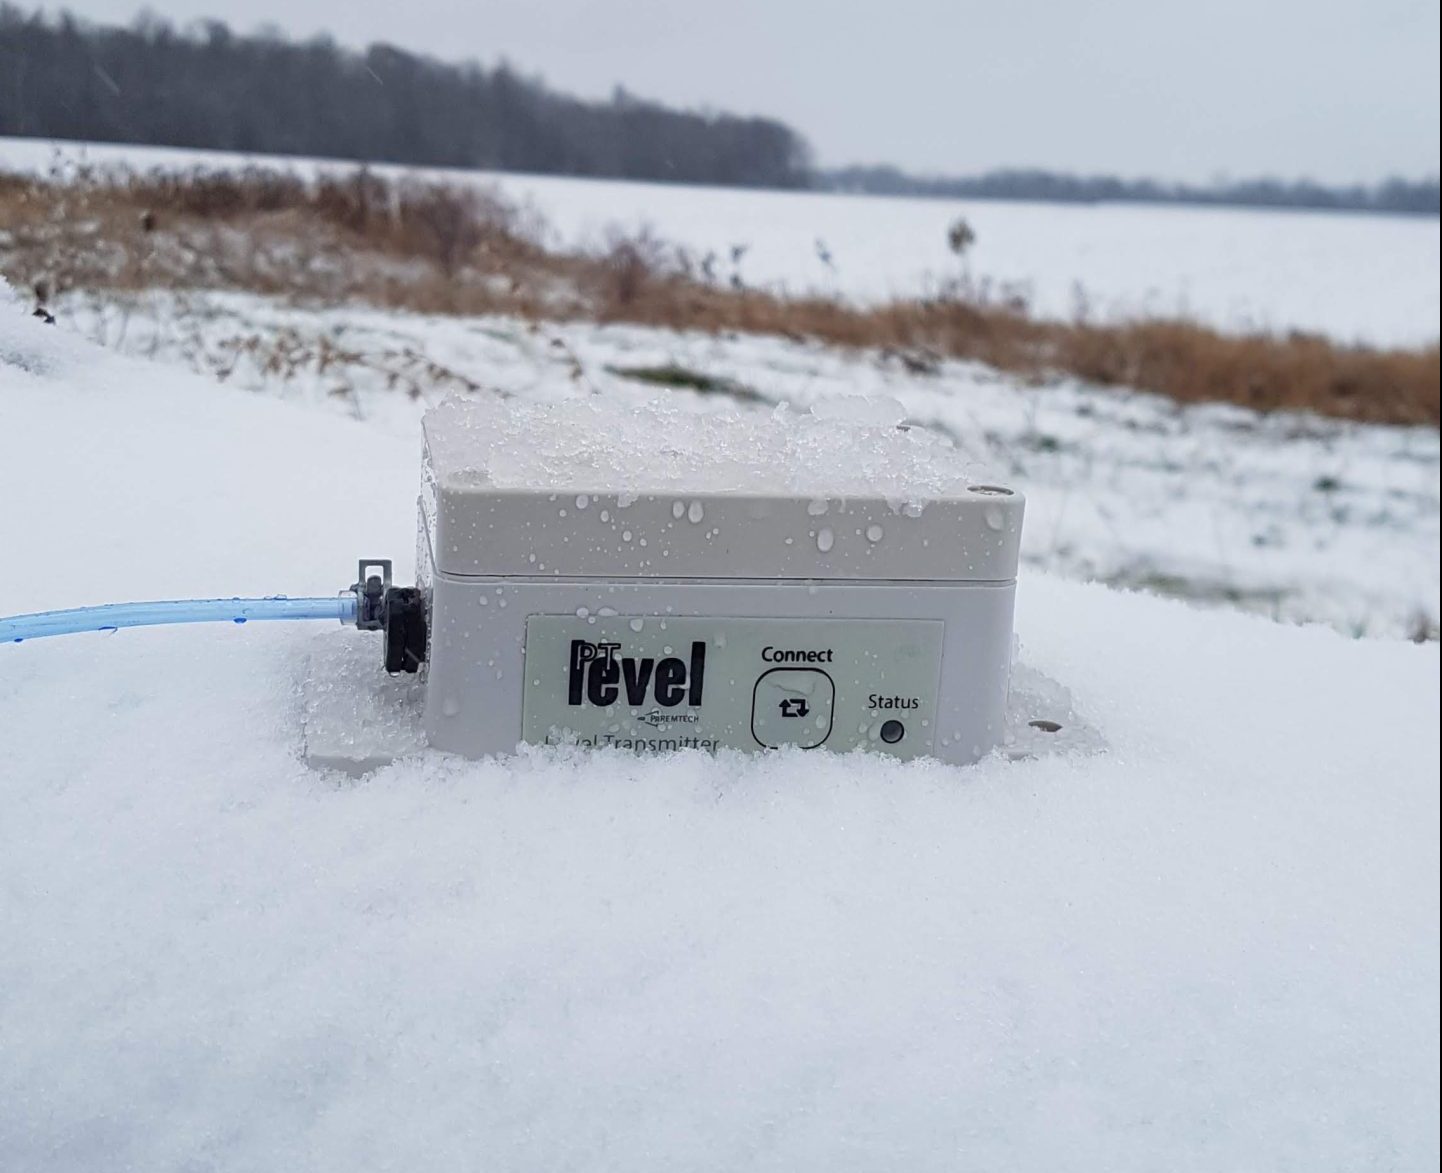
The PTLevel is a smart liquid level monitor that brings sump pump awareness to your fingertips via your phone and/or computer. With the pressure chamber installed directly into your sump pit, you can get real-time and accurate level information within the app or emailed/texted to you in the event of an unexpected level.

How Does the PTLevel work with Sump Pump Systems

The PTLevel Can:
– measure actual water level in your sump pit with precision
– send real-time alerts via text or email when water rises too high or goes too low
– track sump pump level activity over time, giving you a history of how often your pump is running
– works in extreme cold, heat, and damp, and humid environments
– The Long Range Wireless PTLevel can report in as frequently as every 4 minutes, The Wired WiFi PTLevel can report in as frequently as every 2 minutes.

If you manage multiple properties or own a seasonal cabin, you know that sump pump failures can go unnoticed for days or even weeks. With a PTLevel installed at each site, you can monitor all of them from a single dashboard, without driving around to check basements.

Why Homeowners and Property Managers Love the PTLevel

Early Warning System

Know there’s a problem before the basement floods. If water is rising and the pump isn’t kicking in, you’ll know.

Peace of Mind While Away

Whether you’re travelling or managing a rental/Airbnb, you can monitor the sump pit remotely.

Easy to Install

No complex wiring, plumbing, or digging required. Set-up usually takes under 15 minutes (just power the device, connect to WiFi, install the tubing, then lower the pressure chamber)

Works With Your Existing Pump

The PTLevel doesn’t interfere with your current system, it just watches it intelligently!

Seasonal Sump Considerations

Your sump pump works year-round, but it faces different challenges depending on the season. From frozen discharge lines in the winter to sudden deluges in the spring, preparation is key to making sure your system performs when itโ€™s needed most.

Winter and Sump Pumps

Cold weather can be rough on sump systems. If you live in a region with freezing temperatures, here are some must-do steps before winter sets in:
– Insulate or bury the discharge line: exposed pipes can freeze. If frozen, they can become fully clogged and prevent any water from existing the sump. Also ensure your discharge line if sloped properly and is buried below the frost line (or is insulated).
– Check for standing water in the discharge line: any remaining water in outdoor pipes can freeze and block flow. After your sump pump runs, listen for proper drainage and check the outlet for backup.
– test your pump before the first freeze: you can do this by pouring water into your pit and ensuring the system runs properly.
– Ensure your backup system is working: battery-powered backups must be charged.

Smart Tip; The PTLevel can alert you by text or email if water is rising in the pit when it shouldn’t be (which may indicate a frozen or blocked discharge line.)

Spring and Sump Pumps

Spring is SUMP SEASON, if there is a sump season. Melting snow and frequent rainstorms put your sump pump system to the test.
– Clear snow away from your home’s foundation. By moving excess snow, you can prevent melting snow from pooling near the house and overwhelming your system.
– Extend downspouts. Ensure water is directed at least 10 feet away from your home to reduce the load on your sump pump.
– Inspect your sump pump for corrosion or sediment buildup. After months of winter dormancy, sometimes sediment can settle into your pump or drainage pipes.
– Test early. Don’t wait until the first rainstorm! Pour water into your sump pit prior to expected rain events to test the system.

Smart Tip; A sump pump monitor like the PTLevel is especially helpful in spring because it helps track how often your pump activates and alerts you to unusual activity.

Flood Protection During Hurricanes and Heavy Storms

Even if you don’t live on the coast, powerful storms can cause flash flooding and knock power out for hours or days. Be storm ready:
– Have a back up power source. Battery backups or generators are essential if storms are common in your area.
– secure outdoor discharge pipes. Fast flowing water, debris, and wind can clog or block sump outlets and pipes during a storm.
– Use smart monitoring to your advantage. With the PTLevel, you can receive alerts remotely if water levels are rising/the pump hasn’t activated when it should.

Installation Guide for Sump Pump Systems

Installing a sump pump system is a solid investment in your home’s protection. While it’s possible to DIY, many homeowners opt for professional installation of sump pump systems to ensure reliability. Even if you have a professional installing your sump pump system, here’s what you need to know to familiarize yourself with the process:

DIY vs Professional Installation of a Sump Pump System

DIY

If you are a DIY’er, and you’re handy with power tools, concrete work, and plumbing, then you may be able to install a sump pump system yourself! It can save money for sure, but it’s labour intensive and often involves cutting through your basement floor, setting up drainage, and wiring the pump.

Cost: DIY Cost Approx $250-$600 (Pump, pit liner, check valve, PVC piping, concrete, basic tools)

Hiring a Professional

Hiring a licensed contractor ensures proper placement, electrical safety, and code compliance. It’s the best option if you’re unsure about tools, want faster results, need warranty on the work, or are scared to cut into your basement floor and risk the integrity of the foundation.

Cost: Professional Installation Cost Approx $1000-$3000 (depending on complexity, whether drainage tile is added, and local labour rates)

DIY Sump Pump System Installation Guide

Find the lowest point in the basement, near a wall for easy pipe routing. Avoid placing the pit near footings.

Use a jackhammer or saw to cut a hole in the basement floor. Excavate enough room for the sump basin, leaving about 2โ€“3 inches around it.

Pour a layer of gravel (6″ is typical) at the bottom of the hole. Place the basin on top and ensure itโ€™s level.

Fill the gap around the basin with gravel up to the top edge.

Place the pump in the pit and connect the discharge pipe and check valve according to manufacturer instructions.

Route the pipe out of the house and away from the foundation (at least 10 feet if possible). Add an elbow and splash block or dry well at the end.

Patch around the pit with concrete and let it cure.

Plug the pump into a GFCI outlet. If using a battery backup, follow the installation guide provided with the unit.

Maintenance and Troubleshooting Sump Pump System Problems

A sump pump is only as good as its condition. Regular maintenance ensures your system is ready to work when you need it most, especially during spring melts, major storms, or sudden thaws. Fortunately, keeping your sump system in shape doesnโ€™t take much time.

How Often to Clean Your Sump Pit

At minimum, you should inspect and clean your sump pit twice a year (ideally in early spring and fall.)

To clean your sump pump system;

– first remove debris. Clear out dirt, gravel, or other objects that can clog the pump.

– check the float. Ensure it moves freely and doesn’t catch on the pit walls or debris.

– wipe down the pump and other parts in the sump pit. Using a damp cloth, remove any grime or sediment build-up (this will prevent odors)

– if your sump pump runs often, check the system every 2 months.

Testing Your Sump Sump System

1. Pour water into the pit (about 5 gallons depending on the size of your pit)

2. Watch the float (when it rises, it should activate the pump)

3. Ensure the pump discharges the water and shuts off on it’s own

If the pump doesn’t turn on, or it does turn on but doesn’t draw out water, then you may need further inspection or repair.

Common Issues with Sump Pump Systems and How to Fix Them

Pump won’t turn on

Likely Cause: Power failure, float stuck, failed motor.

Fix: Check power, reset GFCI, inspect float, replace pump if motor is unfixable

Pump runs constantly

Likely Cause: Stuck float, check valve failure, incorrect pump size.

Fix: Adjust float, replace valve, reassess pump capacity.

Strange Noises

Likely Cause: Debris in impeller, motor wear.

Fix: Clean pump, replace worn parts or the full sump pump system.

Water not pumping out

Likely Cause: Clogged discharge pipe, frozen pipe, faulty check valve.

Fix: Clear pipe, add insulation around discharge pipe to prevent freezing, replace check valve.

Smelly sump pit

Likely Cause: organic debris build-up like algae or other bacteria, stagnant water.

Fix: Clean pit, add a sump lid, use a mild bleach solution.

How to Know When It’s Time to Replace Your Sump Pump

Even well-maintained pumps donโ€™t last forever. Most standard sump pumps last 7โ€“10 years, though frequent use can shorten that lifespan.

Signs it may be time to replace your sump pump or sump system:

– it’s more than 7 years old and has never been serviced

– the motor is noisy, sluggish, or hot to the touch

– frequent breakdowns or failures, especially during heavy use like heavy rainfall

– visible rust or corrosion on the pump housing

– it fails the water test (described above)

If you’re unsure, consider replacing your pump before the next wet season. It’s better to be safe than soaked!

Common Basement Water Problems

Water in the basement isnโ€™t just inconvenientโ€”it can lead to costly damage, health risks, and ongoing stress. Understanding the most common causes of basement water issues can help you decide if a sump pump is necessary for your home.

Causes of Basement Flooding

Heavy rain or rapid snow melt: Sudden water surges can overwhelm the soil and seep through cracks in your foundation or floor.

High Water Table: If your home sits in an area with a naturally high water table, groundwater pressure can force water into your basement.

Poor Drainage: Clogged or misdirected gutters, short downspouts, or negative grading around your home can direct water straight toward the foundation. See the image below; this is not directed far enough away from the house foundation!

Foundation Cracks or Seal Failures: Even small cracks in your foundation walls or floor can allow water to enter over time.

Plumbing Leaks: Burst pipes, water heater failures, or other plumbing issues can cause localized flooding.


Signs You Need a Sump Pump

Even if you havenโ€™t experienced full-blown flooding, the following signs indicate your basement is at risk and could benefit from a sump system:

– Damp or musty smells
– Visible moisture or water stains on walls or floors
– Mold or mildew growth
– Efflorescence (a white, chalky deposit sometimes found on basement walls which is minerals left behind from water evaporating)
– Pooling water after rain or snowmelt
– If your neighbour has a sump system, you probably need one too

Frequently Asked Sump Pump System Questions

You ask, we answer!

How long do sump pumps last?

Most sump pumps have a lifespan of 7 to 10 years, depending on usage and maintenance. Pumps that run frequently or are poorly maintained may wear out faster. Regular testing and cleaning can help extend their life.

Should a sump pit always have water?

Not necessarily. The sump pit may be dry for long periods, especially during dry weather. However, it usually fills with water during rain, snowmelt, or groundwater seepage. Some standing water is normal; a completely dry pit year-round could mean your drainage system isnโ€™t working properly.

Can a sump pump run continuously?

A sump pump running continuously is usually a sign of a problem. It could indicate excessive water entering the pit, a stuck float switch, or a faulty check valve allowing water to flow back into the pit. Continuous running can cause the pump to overheat and fail sooner.

What happens to my sump pump in a power outage?

During a power outage, a standard electric sump pump will stop workingโ€”unless you have a battery or water-powered backup system. Without a backup, water can quickly accumulate and cause flooding. Smart monitoring devices like the PTLevel can alert you if water is rising during an outage.

How big should a sump hole be?

A typical sump pit is about 18 to 24 inches in diameter and about 24 to 30 inches deep. It needs to be large enough to hold water during peak inflow and accommodate the pump, float switch, and any backup equipment without obstruction.


Final Sump Thoughts

A basement sump system is more than just a piece of equipment; itโ€™s a vital safeguard for your home, protecting your foundation, belongings, and peace of mind from the damaging effects of water intrusion.

Summary of Benefits

– Prevents flooding during heavy rains, snowmelt, and rising groundwater
– Protects against mold, mildew, and structural damage caused by excess moisture
– Reduces costly repairs and insurance claims related to water damage
– Improves indoor air quality by keeping basements dry and odor-free
– Adds value and confidence to your homeโ€™s overall resilience

Why Every Basement Should Consider a Sump System

Whether youโ€™ve experienced basement flooding or simply want to be proactive, a sump pump system is a smart investment. Changing weather patterns and increasing storm severity mean water issues are becoming more common, even in neighborhoods previously considered low-risk. Installing a sump system today can save you from expensive headaches tomorrow.

How PTLevel Complements Your Sump Pump Setup

The PTLevel takes sump pump protection to the next level. By providing real-time water level monitoring, instant alerts, and detailed usage history, PTLevel ensures youโ€™re never caught off guard. Itโ€™s easy to install, works seamlessly with existing pumps, and gives homeowners and property managers confidence that their basement is being watched 24/7.

In short, a sump pump handles the water, and the PTLevel watches the pump, together delivering a complete defense against basement flooding.


Bestsellers

E. Coli in Cisterns: Risks, Testing, and Prevention

E. Coli and bacteria in cisterns

E. Coli in Cisterns: Risks, Testing, and Prevention

Cisterns are a reliable source of water for many households, cottages, farms, and off-grid properties. They provide essential storage, especially in areas without municipal water connections. But with any private water supply comes responsibility. One of the biggest risks cistern owners face is contamination, especially from E. coli.

E. coli in cisterns is more common than many people realize, and it can pose serious health risks if not addressed. This article explores how ecoli gets into cisterns, what it means for your health, how to test for it, and the best ways to prevent and manage contamination.

What is E. Coli?

E. coli, short for Escherichia coli, is a type of bacteria commonly found in the intestines of humans and animals. While many strains are harmless, some can cause illness when consumed in drinking water.

The presence of E. coli in a cistern is a red flag. It signals that the water has been contaminated with fecal matter, which may also contain other dangerous pathogens, viruses, or parasites. In other words, if your cistern tests positive for E. coli, itโ€™s not just bacteria you need to worry about; itโ€™s a broad indicator of unsafe water.

How Does E. Coli Get Into a Cistern?

Cistern contamination can happen in several ways:

1. Surface Runoff and Rainwater

If your cistern collects rainwater, contamination can occur when bird droppings or animal waste wash off the roof and into the tank. Even a small amount of droppings can introduce harmful bacteria.

2. Unsealed or Damaged Lids

A cracked or poorly sealed cistern lid invites trouble. Animals, insects, or debris can enter and introduce bacteria.

3. Water Delivery Trucks

If you rely on water deliveries, the truck hoses, tanks, or handling methods may not always be sanitary. One contaminated delivery is enough to seed your cistern with E. coli.

4. Nearby Septic Systems

Leaking or improperly maintained septic tanks can leach bacteria into the ground, eventually making their way into underground cisterns or water storage areas.

5. Poor Maintenance

Over time, sludge and biofilm can build up inside a cistern. This creates a perfect environment for bacteria to grow, especially if the tank is never cleaned or disinfected.

Health Risks of E. Coli in Cisterns

The health risks depend on the strain and the amount of exposure, but drinking or cooking with water contaminated by E. coli can lead to:

Mild to severe diarrhea

Stomach cramps

Nausea and vomiting

Fever

In severe cases, particularly with the strain E. coli O157:H7, infection can cause kidney damage and even be life-threateningโ€”especially for young children, the elderly, or people with weakened immune systems.

Even if you donโ€™t drink directly from your cistern, contaminated water can still be dangerous if used for brushing teeth, washing food, or accidentally swallowed during bathing.

How to Test for E. Coli in Your Cistern

The only reliable way to know if your cistern contains E. coli is to test it. Hereโ€™s how:

1. Collect a Water Sample
Use a sterilized bottle from a local health unit or certified lab. Take the sample from a tap thatโ€™s fed directly from the cistern, not from a filtered or treated line.

2. Submit to a Lab
Most health departments or private labs can test water samples for E. coli and total coliform bacteria. Results usually take 24โ€“48 hours.

3. Interpret the Results

    – No E. coli detected: Your water is currently safe from fecal contamination.

    – E. coli detected: Immediate action is required. Do not drink the water until it is disinfected and retested.

    – Total coliforms detected: While not as dangerous as E. coli, this indicates possible contamination pathways.

    Routine testing is key. Many experts recommend testing cistern water at least 3โ€“4 times per year, especially after maintenance, refilling, or heavy rains.

    Free E. coli testing is available for all private wells in Ontario. Ontario.ca

    How to Remove E. Coli from a Cistern

    If a test comes back positive for E. coli, donโ€™t panic; it can be dealt with. Here are the common steps:

    1. Disinfection with Chlorine

    The most common solution is to shock-chlorinate the cistern:

    – Drain the tank if possible.

    – Scrub and rinse the interior to remove sludge and debris.

    – Refill with clean water.

    – Add a chlorine solution (household bleach without additives works in emergencies) and circulate through the system.

    – Allow the water to sit for several hours before flushing.

    2. UV Filtration Systems

    Installing a UV (ultraviolet) water purifier at the point of entry is a great long-term defense. UV systems kill bacteria like E. coli instantly without altering the taste of the water.

    3. Ongoing Chlorination or Ozone

    For households at high risk, a continuous disinfection system using chlorine or ozone can keep water safe.

    4. Professional Cleaning

    If your cistern has years of buildup, hiring a professional cleaning service ensures a thorough job. Or DIY cistern clean!

    Preventing E. Coli in Cisterns

    Prevention is always better than dealing with contamination after the fact. Here are best practices:

    – Keep lids tightly sealed to prevent animal entry.

    – Clean and disinfect your cistern annually.

    – Inspect delivery hoses and request clean handling from water delivery companies.

    – Install a first-flush diverter if using rainwater collection to redirect the initial dirty water off the roof.

    – Test your water regularly to catch problems early.

    – Add a point-of-use filter (such as reverse osmosis) for drinking water taps.

    Common Questions About E. Coli in Cisterns

    Can boiling water kill E. coli?
    Yes. Boiling water for at least one minute kills E. coli and most other pathogens. This is a safe short-term solution until the cistern is disinfected.

    Can I use bleach in my cistern all the time?
    Small amounts of chlorine can help keep water safe, but too much can affect taste and smell. Regular testing is needed to keep levels balanced.

    If my cistern tests positive once, will it always be contaminated?
    Not necessarily. A one-time incident may be solved with cleaning and disinfection, but ongoing contamination suggests a larger problem with your system or environment.

    Final Thoughts

    E. coli in cisterns is not something to ignore. It signals a serious breach in water safety that can affect your health and the health of your family. The good news is that with regular testing, good maintenance practices, and effective disinfection strategies, you can keep your cistern water safe and reliable.

    A cistern should be a dependable water source, not a hidden health hazard. By staying proactive, you can enjoy clean, safe water all year round.

    And if you want to learn how to monitor the liquid level in your cistern, please check out our Canadian-made PTLevels!

    Rising Bulk Water Prices: How to Save Money with Smart Monitoring

    PTLevel Tank History

    Rising Bulk Water Prices: How to Save Money with Smart Monitoring

    The Rising Cost of Bulk Water

    Across North America, homeowners, farms, and businesses are noticing higher bulk water prices. Municipalities are adjusting rates upward to cover increased operating costs, while private haulers charge premiums during high-demand periods. For anyone relying on cisterns or bulk water deliveries, these price changes can add up quickly.

    How Heat Waves Drive Up Water Demand

    During prolonged hot spells, two things happen at once:

    Water Supply Drops

    Rivers, reservoirs, and wells run lower during drought and heat events.

    Water Demand Spikes

    Families, farms, and businesses use more water for cooling, livestock, irrigation, and daily needs.

    This combination creates pressure on systems and increases heat wave water demand. The result? Scarcity pricing, emergency hauling fees, and even water shortages in some communities.

    Why Water Hauling Costs More in Summer

    When demand outpaces supply:
    – bulk water haulers raise rates to cover extra trips and longer hauls
    – municipalities increase wholesale fees to manage treatment and delivery costs
    – emergency fills cost more than planned deliveries (sometimes double!)

    If you rely on a cistern, the risk isn’t just running dry… it’s paying inflated costs for last-minute emergency water deliveries.

    Saving Money on Bulk Water Deliveries with Smart Planning

    The good news: water customers can fight back against rising costs. The key is knowing exactly when your cistern or tank needs a refill. Instead of guessing or waiting until you run out, smart monitoring gives you control.

    The PTLevel liquid level monitoring system is designed to help you:

    – track water levels in real time (the Wired WiFi PTLevel reports in about once every 2 minutes, the Long Range Wireless PTLevel can report in as frequently as every 4 minutes)

    – check your cistern level from your phone, computer or tablet

    – order water only when you need it. Historical usage data and graphs help schedule deliveries at the most cost-effective times.

    share your water level with your delivery driver. Let your local delivery company see your water level, set them up to receive low level alerts, so they can plan efficient routes and keep your emergency deliveries fee costs down.

    By eliminating guesswork, the PTLevel helps families, farms, and property managers start saving money on bulk water deliveries and keep cisterns topped up at the right time.

    Saving Money on Cisterns with Long-Term Monitoring

    Beyond delivery savings, cistern level monitoring with the PTLevel helps protect your cistern investment:
    – identify leaks or unusual consumption early with alerts
    track seasonal trends to manage water budgets
    prevent costly water shortages at rental properties and airbnb’s, cottages, and farms

    Installing a PTLevel is a simple way to make your cistern more efficient and ensure youโ€™re saving money on cisterns year after year.

    Final Thoughts: Peace of Mind During Heat Waves and Year-Round

    Water is becoming more expensive, and climate-driven heat wave water demand will keep pushing costs higher. For homeowners, farms, and property managers, waiting until youโ€™re out of water is becoming unaffordable.

    With PTLevel, you gain peace of mind and practical savings. By monitoring your cistern in real time, you avoid emergencies, reduce costs, and keep your water supply secure… no matter how hot the summer gets.

    How to save money on your cistern water bill

    PTLevel Tank History

    How to save money on your cistern water bill

    Managing water levels in your cistern or tank isnโ€™t just about convenienceโ€”itโ€™s also about saving money. The PTLevel, with its accurate monitoring, alert system, and data-sharing capabilities, can help you avoid unnecessary water deliveries and optimize your water usage.

    Scroll to the bottom of this article to use our free water savings calculator.

    Hereโ€™s how you can save money on your cistern water bill with the PTLevel:

    The Cost of Guessing

    For many, ordering water is a guessing game. You might call for a refill when you think your cistern is low, only to find out it wasnโ€™t as empty as you thought. This can really affect how to save money on your cistern water bill. Or worse, you forget to check, and the tank runs dry, leading to emergency deliveries with added fees.

    Other people opt for routine monthly deliveries to avoid running out of water. While this may seem convenient, it often leads to over-delivery, where your tank is filled more often than necessary. Paying for water you donโ€™t need is money wasted.

    Both scenarios cost you moneyโ€”and peace of mind. Thatโ€™s where the PTLevel comes in to help save money on your cistern water bill.

    Smarter Water Management

    The PTLevel provides real-time data on your water levels, accessible right from your smartphone or computer. With this innovative device, you can:

    Eliminate Routine Overordering: Stop wasting money on unnecessary monthly cistern water deliveries and bills.

    Order When Needed: Schedule water deliveries only when your tank is nearing empty.

    Avoid Emergency Fees: Set low-water alerts to ensure you never run out unexpectedly.

    Share Levels with Your Water Delivery Company: Grant access to your PTLevel data so they can monitor your levels and deliver water exactly when you need it, helping you on how to save your cistern water bill money effectively.

    Monitor Water Usage Remotely: Property managers can keep an eye on water levels, even when others are in the home, like Airbnb tenants. This ensures proper water usage and helps you stay on top of any unexpected spikes in consumption.

    By relying on precise data, you avoid the cost of guesswork and bring efficiency to your water delivery process.

    Why Does a Water Delivery Cost So Much?

    Water delivery costs can seem high because the true expense lies not in the water itself but in getting it to your location. Delivery services must account for a range of operational costs, including driver wages, vehicle fuel, and commercial insurance. Maintaining large delivery trucks is particularly expensive, as these vehicles undergo significant wear and tear. Additionally, emergency or after-hours deliveries come with added costs due to overtime pay and the logistical challenges of adjusting schedules to meet urgent requests.

    These factors contribute to the overall cost of the service, ensuring reliable and timely delivery regardless of circumstances. While the water might be inexpensive, the infrastructure, labor, and resources required to bring it to your door drive up the price. This is why effective water management and tools like the PTLevel can help minimize the need for unexpected or frequent deliveries, saving you money over time and showing you how to save money on your cistern water bill.

    Are you a water hauling business? Find out how the free PTDevice portal for Water Delivery Businesses can save you money and help customers find you!

    PTLevel Tank History

    How PTLevel Saves You Money

    Eliminates Dry Tank Emergencies

    Running out of water can lead to emergency delivery charges or temporary fixes like purchasing bottled water for household needs. These costs add up quickly. Knowing how to save money on your cistern water bill can help manage these scenarios.

    Streamlined Delivery Timing

    Sharing your PTLevel data with your water delivery company allows them to deliver precisely when your tank requires itโ€”no sooner, no later. This prevents premature deliveries and ensures you always have enough water without overstocking.

    No More Overordering

    Many water delivery companies charge per trip or have a minimum fill requirement. With routine deliveries, you might be paying for water you donโ€™t yet need. The PTLevel ensures your tank is only filled when necessary.

    Monitors Water Usage in Shared Properties

    If youโ€™re managing an Airbnb or other rental property, the PTLevel lets you keep tabs on water usage while guests are in the home. This ensures responsible usage and alerts you to potential overuse or leaks that might require attention, ultimately leading to how to save money on your cistern water bill in such properties.

    The PTLevel helps you track patterns in your water usage, allowing you to optimize consumption and spot issues like leaks or overuse. Addressing these problems saves you money in the long run.

    Take Control of Your Water Budget

    The PTLevel isnโ€™t just a monitoring deviceโ€”itโ€™s a money-saving tool that helps you and your water delivery company work smarter, not harder. Whether youโ€™re managing a household cisternhttps://paremtech.com/outdoor-cistern-level-monitoring/, a commercial tank, or a property with rotating tenants, the PTLevel puts you in control by:

    Cutting out unnecessary expenses from routine or emergency deliveries.

    Giving property managers oversight of water usage when others are in the home.

    Ensuring peace of mind that your water supply is sufficient.

    Let’s do a money-saving case study!

    Scenario:

    Tank starts full (100%) and is refilled when it reaches either 30% or 10%.

    Waiting to refill at 10% extends the refill cycle by 1.5 weeks.

    Assumptions:

    30% Refill Cycle: Takes 4 weeks to go from 100% to 30%.

    10% Refill Cycle: Takes 5.5 weeks to go from 100% to 10%.

    Each delivery costs $300.

    Calculation:

    Deliveries per year = 52 weeks รท refill cycle duration (weeks).

    Total cost = deliveries per year ร— $300.

    Annual savings = cost difference between the two scenarios.

    How to save money on your water bill with a cistern

    Explanation

    If you refill at 30%, you’ll need 13 deliveries per year, costing $3,900.

    If you wait to refill at 10%, you’ll only need 9 deliveries per year, costing $2,836.

    This results in $1,064 in annual savings.

    Use the calculator below to calculate your savings!

    Water Delivery Savings Calculator

    Water Delivery Savings Calculator

    Results:

    Deliveries per Year (Without PTLevel): 0

    Deliveries per Year (With PTLevel): 0

    Total Cost (Without PTLevel): $0

    Total Cost (With PTLevel): $0

    Annual Savings: $0

    PTLevel on Farms; A Case Study in Collaboration

    Liquid Level Monitoring Solutions on a Farm

    PTLevel on Farms; A Case Study in Collaboration

    At Paremtech Inc, we specialize in manufacturing liquid level monitoring solutions. We produce high quality devices and components that are integral to liquid monitoring across North America. Our PTLevel liquid level monitoring solutions are used in homes, small and large businesses, and extensively in agriculture. Let’s explore how the PTLevel is transforming water level monitoring at Narrows Edge Elk Farm in Ontario, Canada.

    Versatility in Liquid Monitoring

    Liquids, from water to fertilizers and septic’s, are an integral part of countless industries. At ParemTech Inc, we produce components and liquid level monitoring solutions that serve as a building block for larger projects. Therefore whether you need detailed downloadable liquid level history graphs, SMS text alerts to your phone when your level gets to a specific volume, or even the ability to share your level with your water delivery company, the PTLevel has you covered. Our advanced manufacturing processes and PTLevel device programming adapt to your unique farming needs. As a result, this universality ensures that the solutions we deliver integrate seamlessly with your processes, enhancing your overall bottom-line.

    Running out of water on a farm can be catastrophic for your family and animals.

    A Case Study: Narrows Edge Elk Farm

    Growing the largest elk antler in Ontario is Narrows Edge Elk Farm in Niagara, Ontario. Although they started with a small herd in August 2023, they are no strangers to the challenges of farm-life. In fact, Reg is a 4th generation farmer. They are currently focusing on growing the herd. And they are also busy building fencing, growing food for the elk, and learning all they can about these wonderful creatures.

    Indeed starting a farm, no less an elk farm, is not for the faint of heart.

    From worrying about the elk, minerals, feed, fencing, predators, and more; one thing they didn’t want to have to worry about is running out of water! Being off the water-grid, their only water source options were a 5000 gallon cement cistern and a variety of ponds. A PTLevel for monitoring their cistern water was an easy choice giving them freedom to worry about other farm priorities, not running out of water.

    Similarly, but not PTLevel-related; their elk have automatic waterer’s hooked up to a pond (that doesn’t run dry) so they also don’t need to worry about the elk running out of water!

    Check out the Instagram Post to hear what the elk have to say (you can hear them bugle in the background!)

    The Benefits of monitoring water and liquids on a farm with the PTLevel

    Choosing the right liquid level monitoring solution can transform your farming operations. With a PTLevel, you gain access to:

    Long Range Water Level Monitoring

    The PTLevel is a weather-resistant liquid level monitor with up to 1km range. The receiver is plugged-in inside your house or barn where there is a WiFi signal. The transmitter is installed up to 1km away at the tank and is battery-powered.

    Long range solutions, up to 1 km or 0.62 miles, are important for farming operations where the WiFi doesn’t reach to ever corner of the land. Monitoring water oand other liquids in rivers, ponds, wells, cisterns, and even remote tanks on your farm can be done by the PTLevel.

    Cistern Level Monitor on a farm

    Septic Tank Monitoring

    Fit all pieces together outside of the tank and push the septic adapter into place. There’s no need to get your hands dirty!

    Septic tanks and holding tanks are common in rural farming operations. Using the PTLevel to monitor them allows you to have early warning signs if they are getting too full. The PTLevel sends out an email or SMS alert at levels you specify, allows you to prevent a septic back-up.

    Septic Tank High Low Monitor

    Chemical Tank and Fertilizer Tank Monitoring

    The PTLevel is designed to measure any liquid that has a consistent density including fertilizer tanks, chemical tanks and even 5 gallon pails.

    Pressure Chamber, cap, and Pressure Chamber Base: PVC
    Check Valves Bead: ABS
    2″ Flange, Spacer: ABS
    Rubber threads: TPU
    Tubing: Polyurethane

    Some tanks on farming operations are more essential than others, and preventing running out is critical! Also monitoring use over time can be helpful in determining trends and estimating costs.

    Chemical Pail and Fertilizer Tank Monitoring on a farm

    Sump Pump Monitoring

    With the Wired WiFi PTLevel (WiFi and power required at the sump) or the Long Range Wireless PTLevel (set to the highest reporting settings), you’re able to get low and high level alerts in nearly real-time (every 4 minutes) to prevent sump pump problems or basement/building floods. The PTLevel can monitor tanks as small as 18″ or as large as 18′.

    Set a low alert to get a notification if your sump pump gets stuck “on”. Set a high alert to get a notification if your pump is no longer pumping (or isn’t keeping up with the water coming in).

    Sump Pump water monitoring on a farm or in a basement

    Deep Well Monitoring

    Monitor drilled wells as deep as 70′ with the Deep Well Long Range Wireless PTLevel.

    Using the same long-range technology, App, dashboard, and weather resistant design; but with a stainless steel transducer with rubber-coated electrical wire. Made with our most robust electrical potting solutions for your harshest chemicals or deep well environments.

    The PTLevel is monitoring deep water wells on farms across North America.

    Deep Well Monitor

    Liquid or Pump Temperature Monitoring

    The stainless steel temperature probe can be inserted directly into liquids, attached to the side of a pump, or attached to pipes. Using the same reporting times as the device, the temperature probe tracks the temperatures in a graph and also has high and low alert points.

    Rated for -55oC to 125oC

    Liquid Temperature Monitoring

    All on one Dashboard

    There is no maximum number of devices per account

    Liquid Level Dashboard

    Made in Ontario Advantage; PTLevel for Water Level Monitoring on Farms

    Our PTLevels are proudly made in Ontario including all of our pressure chamber parts, pick-and-placed PCB boards, electrical potting and conformal coating, and design and programming! Making our products in Ontario means faster lead times, exceptional customer support, and lower shipping costs. It also allows us to be at the forefront of design changes and world-wide component shortages.

    Living Without Municipal Water: Exploring Water Supply Options

    Cement Cistern, an alternate water supply option to municipally supplied water

    Living Without Municipal Water: Exploring Water Supply Options

    Choosing a reliable water supply is one of the most crucial aspects of living without municipally supplied water. With multiple options available, itโ€™s important to weigh the pros and cons of each to find the right fit for your needs. Below, we break down the benefits and drawbacks of the most common non-municipally supplied water methods.

    1. Cement Cisterns (For Water-Trucked Fills or Rain Collection Fills)

    Pros:

    Durability: Cement cisterns are robust and can last for decades with minimal maintenance.

    Large Capacity: Ideal for holding significant amounts of water, supporting larger households or those who need substantial reserves.

    Temperature Regulation: The thick walls help keep water cool in summer and prevent freezing in winter.

    Multiple Fill Options: Can be filled with trucked-in water or by collecting rainwater, offering flexibility.

    Learn about monitoring water usage in cisterns.

    Cons:

    Initial Cost: The construction cost for a cement cistern is higher than for other options.

    Installation Complexity: Requires professional installation, including excavation and structural work.

    Maintenance: Cracks can form over time, leading to potential leaks that need repair.

    Trucked-In Water Dependency: Regular fills may become costly if rain collection is insufficient or during droughts.


    2. Plastic Cisterns

    Pros:

    Affordability: Plastic cisterns are cheaper than cement ones, making them more accessible for budget-conscious users.

    Easy Installation: Typically lightweight and easier to set up compared to cement cisterns.

    Variety of Sizes: Available in a range of sizes, suitable for small to medium water storage needs.

    Non-Corrosive: Resistant to rust and corrosion, extending the lifespan of the cistern.

    Easy to Clean: Even if they get dirty or get an algae bloom, they can be cleaned by power washing or with chemicals.

    Cons:

    Vulnerability to Sunlight: Prolonged UV exposure can degrade the material over time.

    Insulation Issues: Less effective at temperature regulation, making them prone to freezing in winter and heating in summer.

    Durability Concerns: Not as strong as cement and may be susceptible to punctures or damage.


    3. Drilled Wells

    Pros:

    Reliable Water Source: Can provide a steady, long-term water supply if a productive aquifer is tapped.

    Minimal Maintenance: Once established, a well typically requires low maintenance beyond the pump.

    High Volume: Often yields enough water to meet household needs year-round.

    Cons:

    High Upfront Cost: Drilling can be expensive, especially in hard or deep rock areas.

    Dependency on Groundwater Quality: Contaminants such as minerals, chemicals, or bacteria may require additional filtration.

    Energy Requirements: An electric or alternative energy pump is needed to access the water.

    Regulatory Permits: May require permits and adherence to local regulations.

    Too deep to monitor: Most deep well monitors only go to 70 feet or 22 meters depth maximum.

    4. Dug Wells

    Pros:

    Cost-Effective: Generally less expensive to construct than drilled wells.

    Shallower Depths: Easier to construct in areas with a high water table.

    Lower Technology Needs: Can be simpler to install without high-tech equipment.

    Cons:

    Limited Water Volume: Shallower wells may run dry during droughts or heavy usage.

    Contamination Risk: More susceptible to surface contamination from runoff or nearby pollutants. Read about hard water here.

    Labor Intensive: Can require significant manual labor for digging and maintaining.

    Prone to Collapse: Structural reinforcements are needed to prevent wall caving.

    5. Rain Collection Tanks

    Pros:

    Eco-Friendly: Reduces dependency on groundwater and uses a natural, renewable resource.

    Customizable: Can be adapted in size and placement to fit individual needs.

    Low Running Cost: Once installed, rainwater collection incurs minimal costs.

    Cons of Rain Collection

    • Weather Dependent: Not a reliable option in arid or unpredictable climates.
    • Storage Limitations: May require large tanks for sufficient storage during dry spells.
    • Initial Investment: High-quality tanks and proper filtration systems can be costly.
    • Maintenance: Regular cleaning and upkeep are needed to ensure water quality.
    Water tote

    6. Streams, Ponds, and Rivers

    Pros of using a pond/stream/river as a water supply

    • Natural Supply: Can provide a continuous source of water if nearby.
    • No Drilling or Digging: Minimal setup if access is already available.
    • Multi-Purpose: Can be used for irrigation, livestock, and other non-drinking purposes.
    Collecting water from a pond

    Cons:

    Seasonal Variability: Water levels may fluctuate with seasons, affecting availability.

    Contamination Risk: Natural water sources can harbor bacteria, pollutants, or runoff contaminants and require treatment.

    Access and Rights: Legal restrictions may limit water use from these sources.

    Infrastructure Needs: Pumps, pipes, and filtration systems are often necessary to make the water suitable for use.


    Conclusion

    When selecting an off-grid water supply option, consider factors such as cost, maintenance, climate, and local regulations. Cement and plastic cisterns are great for those needing substantial storage, while wells offer steady supplies if groundwater is accessible. Rain collection is ideal for eco-conscious homeowners, and natural water bodies are useful with the right filtration. Each option comes with unique benefits and challenges, so choose based on what aligns with your lifestyle and location.

    Hard Water in Cisterns and Your Home

    Shower head

    Water is crucial for daily activities like drinking, cooking, cleaning, and bathing. But when your water contains high levels of minerals such as calcium and magnesium, you may be dealing with hard water. This can affect not just your homeโ€™s plumbing and appliances but also your overall water quality. Below, we explore the signs of hard water in cisterns and homes and offer solutions to help you manage its impact.

    Is Your Home Affected by Hard Water?

    Detecting hard water in your home or cistern is essential to avoid potential complications.
    You can test for hard water with a product like this.
    Hereโ€™s what to look for:

    Persistent Soap Scum and Residue

    Hard water spots on glasses

    One of the first indications of hard water is soap scum buildup on shower doors, sinks, and utensils. The minerals in hard water prevent soap from lathering properly, leaving a sticky residue thatโ€™s tough to clean. This not only leads to more frequent scrubbing but also necessitates stronger cleaning agents, adding to maintenance time and cost.

    Hard water spots on glass

    Solution: Install a whole-house water softening system to reduce mineral content and improve soap performance. For immediate relief, adding a ยฝ cup of white vinegar to your dishwasher cycle can help cut through the residue and leave dishes sparkling clean.

    We recommend contacting your local water supply business for a whole-house water softener system. But if you’re looking for a DIY option, or want to start small, you could always try just a water-softener shower head or a little bit bigger of a system to handle softening your laundry and shower.

    Stiff, Faded Laundry

    Dull laundry

    Do your clothes come out of the wash feeling stiff or looking dull? The minerals in hard water in your home nteract with detergents, making them less effective and causing detergent residue to cling to fabrics. Over time, this leads to faded colors, rougher textures, and more stubborn stains that resist removal.

    What colour did these towels even used to be?

    Dingy laundry towels from hard water

    Solution: To help soften the hard water in your home coming from your cistern, specifically your laundry, and help your laundry feel softer, add ยฝ cup of white vinegar to the rinse cycle. Vinegar acts as a natural fabric softener, breaking down mineral buildup on clothes.

    Reduced Water Pressure and Clogged Plumbing

    Over time, hard water minerals can build up inside pipes, narrowing the water flow and reducing water pressure. This can lead to clogged faucets and showerheads that need constant cleaning to function properly. If the buildup goes unaddressed, it can result in more severe issues, such as pipe corrosion or complete blockages, which can be costly to repair.

    Solution: Installing a water softening system can prevent mineral buildup and protect your plumbing. Regular maintenance and descaling of affected fixtures can also help manage buildup.

    Scale Buildup on Appliances

    Hard water takes a toll on appliances, especially those that use heating elements or handle large volumes of water, like kettles, dishwashers, hot water tanks, and washing machines. The presence of white or yellowish scale deposits on heating elements or around appliance edges is a clear sign of hard water. This buildup can reduce the efficiency of your appliances and shorten their lifespan, potentially leading to expensive replacements.

    Hard water can also build up inside your cistern and pipes. Once you’ve determined that you have hard water, the best way to obtain soft water and get rid of your hard water is toย get a water softener. Water softeners use ion exchange to replace calcium and magnesium ions with sodium or potassium ions, reducing water hardness. Will a water filtration system reduce your water flow rate?

    Solution: Use a water softener to protect appliances from scale buildup. For smaller appliances like kettles and coffee makers, run a cleaning cycle with a solution of water and white vinegar to dissolve existing mineral deposits.

    Dry, Itchy Skin

    Washing in hard water can cause dry, itchy skin

    Hard water can affect more than just household itemsโ€”it can impact your skin. Bathing or washing with hard water can strip away the natural oils from your skin, causing dryness and irritation. The leftover soap residue from hard water further exacerbates this, making it difficult to maintain hydrated, healthy skin.

    Shower head

    Solution: Consider installing a water softener or using moisturizing body washes designed for hard water. Installing a shower filter that reduces mineral content can also help maintain skin health.

    What happens to your PTLevel in hard water?

    Almost all appliances are affected by hard water in some way, and the PTLevel is no exception. The good news is, there is not too much change! To start, the water readings will not be affected by hard water. The PTLevel is designed to monitor the liquid level of water, chemicals, RO tanks, fertilizer tanks, etc; so having hard water is not a problem. We would just recommend making sure the pressure chamber hole does not get blocked by mineral build up annually. If you see build up starting to form, simply scrubbing it off or soaking the pressure chamber in white vinegar will help. Read more about the maintenance here.

    Conclusion: Take Action Against Hard Water

    Spotting the signs of hard water in your cistern or home is the first step toward improving your water quality. From dealing with soap scum and clogged pipes to extending the life of your appliances and preserving your skin health, addressing hard water is crucial. If you suspect your home has hard water, consider testing your water supply and exploring solutions like installing a whole-house water softening system or incorporating simple fixes like white vinegar in your cleaning routines. With a proactive approach, you can maintain a cleaner, more efficient home environment and enjoy the benefits of softened water.

    How to Protect Your Cistern or Well in Winter

    Your PTLevel can handle the winter weather, but is your cistern ready?

    How to Protect Your Cistern or Well in Winter

    In winter your PTLevel can handle the weather, but make sure your cistern can too! Repair cracks, close up gaps, and prevent your pipes from freezing.

    Is your water system ready for winter?

    Why to prepare your cistern or well for winter

    As temperatures start to drop, itโ€™s essential to make sure your water supply systemโ€”whether itโ€™s a cistern or a water wellโ€”is prepared for winter. Taking the time to winterize your system can prevent costly repairs, maintain water quality, and ensure you have uninterrupted access to water throughout the cold months. Here’s a step-by-step guide to help you get ready.

    1. Inspect and Clean the System

    Before winter sets in, inspect your cistern or well for any signs of wear or damage. This includes checking:

    The tank or well casing for cracks or leaks. If you see a crack, it should be repaired before winter. Plastic tanks and cement cisterns are repaired using different techniques; make sure to reach out to your local cistern specialists for repair.

    Pipes and fittings for signs of corrosion or loose connections.

    The pump for proper operation.

    For cisterns, itโ€™s also a good idea to give the tank a thorough cleaning. Remove any debris or sediment that may have built up over time. This helps maintain water quality and ensures smooth operation throughout the winter.

    2. Insulate Pipes and Tanks

    Another way to prepare your well or cistern for winter is to prepare your water pipes. Freezing temperatures can cause pipes to burst, leading to water loss and costly repairs. Insulate any exposed pipes, especially those running above ground or in unheated spaces. You can use foam pipe insulation or even wrap pipes with heat tape to prevent freezing.

    For cisterns, if your tank is above ground, consider insulating the tank itself or using a cistern heater to prevent freezing. For wells, make sure the well cap and casing are adequately insulated to keep out cold air and moisture.

    3. Check the Pump

    Your pump is a critical part of your water system, and winter can be tough on it. Make sure the pump is properly lubricated and running efficiently. For above-ground pumps, consider insulating them or installing a pump house to protect them from the cold.

    If you use a submersible pump, itโ€™s typically safe from freezing, but youโ€™ll still want to inspect the electrical connections and make sure the control box is secure.

    4. Monitor Water Levels Regularly

    Winter storms and freezing conditions can affect your water supply, especially if you rely on a water well. The PTLevel is an excellent tool for this, providing real-time monitoring of your well or cistern levels. It can alert you if the water level drops too low, so you can take action before running out of water.

    5. Prevent Contamination

    During winter, melting snow and ice can lead to surface water contamination in wells. Ensure your well cap is securely in place and in good condition to prevent water and debris from seeping in. Cistern owners should also check for any gaps or openings where contaminants could enter.

    If you live in an area prone to flooding, consider raising the wellhead above the expected flood level or ensuring the cisternโ€™s lid is properly sealed.

    6. Consider Installing a Backup Power Source

    Winter storms can lead to power outages, which can interrupt your water supply if your system relies on electricity. Having a backup generator ensures that your pump continues to operate even when the power goes out, keeping water flowing in your home.

    7. Test Your Water Quality

    Lastly, itโ€™s important to test your water quality before winter. Cold weather can sometimes impact water quality, especially in shallow wells or cisterns exposed to surface conditions. Testing for bacteria, pH levels, and other contaminants gives you peace of mind knowing your water is safe for consumption throughout the winter months.

    Pictured below is the Med Lab 16-in-one test strips that we use for our house! (They have not sponsored this post, but honestly we love their products and encourage you to try them out! They measure Lead, Fluoride, Iron, Copper, Mercury, Total Chlorine, Nitrite, Nitrate, pH, Total Alkalinity, Total Water Hardness, Aluminum, Sulfate, Bromine, Free Chlorine, and Cyanuric Acid.)

    Final Water Winterizing Thoughts

    Winterizing your cistern or well is essential for avoiding costly repairs and ensuring a steady supply of clean water all season long. By following these simple stepsโ€”inspecting your system, insulating, monitoring water levels, and safeguarding against contaminationโ€”you can protect your water supply from winterโ€™s harsh and unpredictable conditions. Plus, with the help of modern tools like the PTLevel, you can enjoy the convenience of real-time water level monitoring, no matter how cold it gets outside.

    Water Well Level Monitoring

    Water Level History

    How Much Water Do I Have in My Well?

    Understanding how much water is in your well is crucial for managing your household’s water usage. A reliable water level monitoring system can provide real-time data on the amount of water in your well, helping you make informed decisions about your water consumption. The PTLevel not only monitors your well but also offers a running history of up to one month, giving you a clear picture of your well’s water levels over time. In addition, with the ability to send notifications via email or SMS, you’ll always know when your water levels are getting low. Getting notified at a water level that you decide can make all the difference.

    To calculate your well volume: For rectangular prism wells, just measure the length (L) by the width (W) by the height (H). Measurements in cm divided by 1000 gives volume in litres. Measurements in feet x 6.2 gives volume in imperial gallons. To calculate volume of cylinder wells, just multiply ฯ€ x radius-squared x height.

    For drilled wells as deep as 70′

    How Far Does My Well Level Drop During Usage?

    Have you ever wondered how much your well’s water level drops when you shower, water the lawn, or do laundry? The PTLevel can provide answers by tracking how your well responds to various water demands. By monitoring you can see exactly how much your well is impacted by daily activities. This insight can help you optimize water usage and ensure your well can meet your household’s needs without running dry.

    Fun Fact: It took 73 minutes for a toilet running to drain a 150 gallon RO tank to 24 gallons. Review the 3 pictures below to see how the PTLevel tracked that data and alerted to the problem.

    Are Neighboring Properties Affecting My Well Supply?

    In some areas, multiple properties may draw water from the same aquifer, potentially affecting each other’s supply. If you’ve noticed fluctuations in your well’s water levels that don’t correspond with your own usage, it might be worth investigating whether neighboring properties are impacting your well. The PTLevel’s continuous monitoring can help you track these changes.

    Also, it might not be the neighbours using your water! Did you know willow trees drink up to 100 gallons of water per day? If your dug well is near shallow-root trees like willows, then the trees could be to blame.

    The Benefits of a Well Water Level Monitoring System

    A water level monitoring system like the PTLevel does more than just keep track of your well’s water levels. It can alert you to trends in water usage, identify potential issues like broken or leaking pipes, and notify you when your water levels reach critical points. By receiving alerts via text or email, you can adjust your water usage accordingly, preventing unexpected shortages and ensuring that your well remains a reliable source of water. There are many benefits to turning your well into a Smart Well!

    The Right Monitoring System for Wells

    We get it, the $30-$50 water level monitoring systems are tempting – but be informed with what you’re getting! Often the very inexpensive systems are made with ultrasonic sensors which are prone to fogging up and freezing, rendering them useless. Or their “long range” capabilities are only 3 meters. Some other systems seem great, but you have to pay a monthly fee to access your data! And even others seem perfect, except you have to be on-site or right beside the system to collect the data. As a result, before you buy understand what you’re looking for and make sure it checks all of the boxes!

    The PTLevel is designed to operate in extreme weather conditions, ensuring accurate and reliable monitoring no matter the season. The Long Range Wireless PTLevel has a range of up to 1km. It uses a robust pressure sensor system which can handle ice, snow, rain, freezing conditions, and even extreme heat. Whether you live in an area with harsh winters or hot summers, the PTLevel is built to withstand the elements and providing you with vital information about your well’s water levels. You do not have to pay monthly for your data – it’s all included! (Yes you can upgrade to premium where you can get additional features. Eg. multiple alert recipients, unlimited alert points, and 2 years of level history. Even without upgrading, you still get all of the basic features including 1 month of history, 2 alert points, sharing with your water delivery company, and more). And as always, you can access your PTLevel data anywhere on any device; with the App or through a browser.

    Conclusion

    Water well level monitoring is essential for managing your water supply effectively, especially if you rely on a well for your household’s needs. With the right well monitoring system you can gain valuable insights into your water usage. Insights like detecting potential issues early, and ensure that your well remains a dependable source of water. Don’t wait until your well runs dryโ€”invest in a PTLevel monitoring system today and take control of your water supply.

    >